Your first program
Every base needs a sign at the entrance. Today you build the first part of your base computer: a display wall that greets your visitors with "Welcome to my base!". A program writes the text, and a button starts it.
New words
- Instruction: one step a computer carries out, like "clear the screen" or "write this text".
- Function: a named part of a program. A trigger block starts a program at one of its functions.
- Cursor: the glowing pillar on the cursor rail. It shows which line the computer is working on.
What you need
From the creative inventory: a trigger block, a wrench, a button and two display blocks. Language blocks: PROGRAM, NOOP, FUNCTION, BEGIN, END, CALL, PARAMETER, LABEL, LITERAL and OPERATOR.
The idea
A program is a list of instructions. The computer carries them out one after the other, from the top to the bottom, like you follow a recipe: first crack the eggs, then stir, then bake.
Our sign needs two instructions:
- Clear the screen.
- Write "Welcome to my base!".
The order matters. If you wrote the text first and cleared the screen afterwards, the sign would stay empty.
The program
PROGRAM sign
NOOP
NOOP
FUNCTION welcome
BEGIN
    CALL CLS
    CALL PRINT
        PARAMETER value "Welcome to my base!" ;
END FUNCTION
Building it
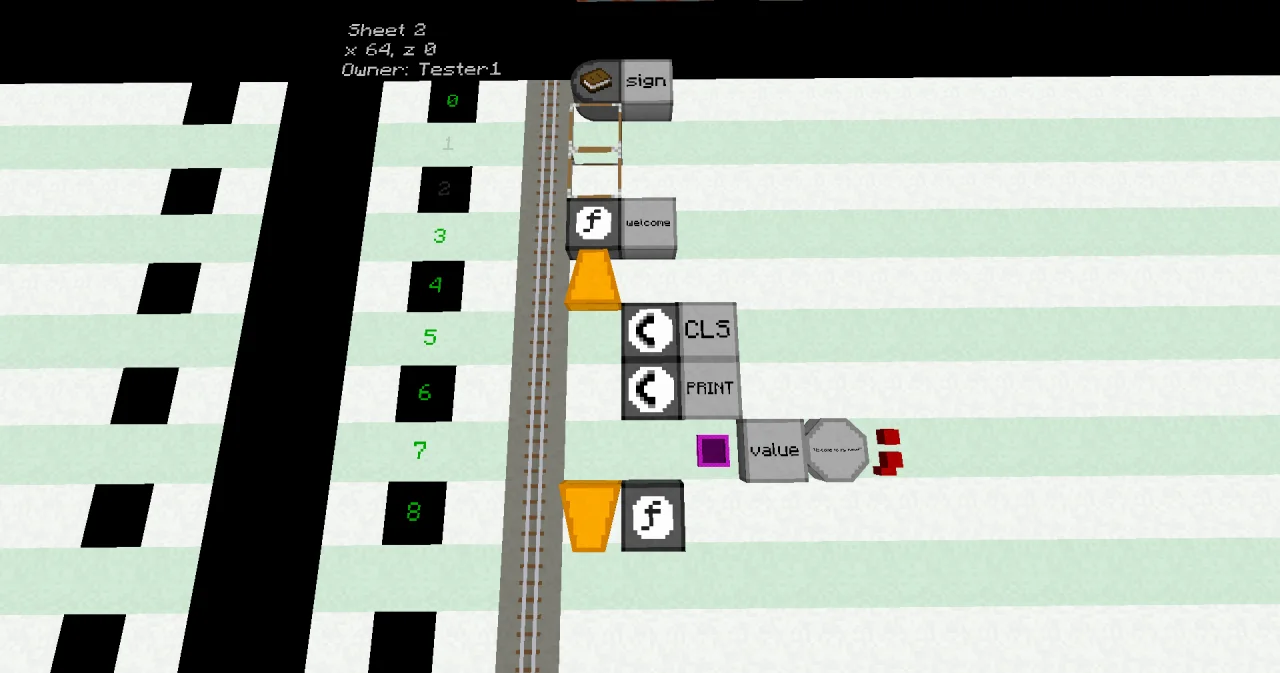
Take your wrench and right-click the trigger block from the last lesson (or a new one). You land in front of a free sheet. Start at its north end, at x=5 (the first block east of the gray cursor rail).
- Line 0: a PROGRAM block at x=5, then a LABEL. Right-click the LABEL with an empty hand and enter the name
sign. - Line 1: a NOOP block at x=5. Every program needs it here.
- Line 2: another NOOP. A FUNCTION always needs a NOOP line right above it.
- Line 3: a FUNCTION block at x=5, then a LABEL named
welcome. - Line 4: a BEGIN block at x=5.
- Line 5: a CALL block at x=6, one block further east, then a LABEL named
CLS. - Line 6: a CALL block at x=6, then a LABEL named
PRINT. - Line 7: a PARAMETER block at x=7, a LABEL named
value, a LITERAL and an OPERATOR. In the dialog of the LITERAL, pick the type STRING and enter the textWelcome to my base!. In the dialog of the OPERATOR, pick;. - Line 8: an END block at x=5, then a FUNCTION block.
When all line numbers are dark green or faint, the program is ready. Leave the line after the END empty: the first empty line ends the program.
Running it
Leave the dimension (right-click the black floor with an empty hand) and go to the entrance of your base.
- The display wall: place two display blocks next to each other, both facing the path where visitors come in. Together they form one screen with 32 columns and 8 rows. Right-click one of them with an empty hand. Click the Program and Function buttons until they show
signandwelcome, then click ✔. This binds the whole wall to your function. - The trigger block: place it near the wall, where you can reach it. Right-click it with an empty hand, pick the program
signand the functionwelcome. - The button: put a button on the trigger block.
Press the button. The display wall shows:
Welcome to my base!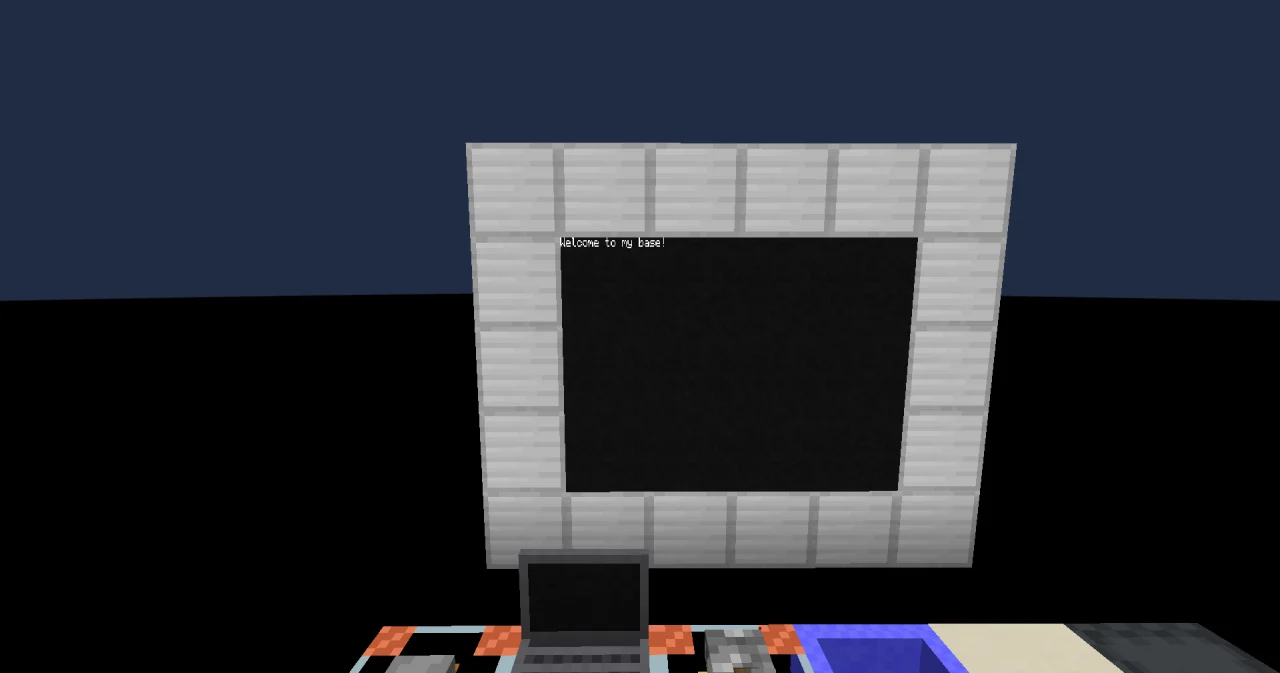
While the program runs, a glowing green cursor moves along the cursor rail of its sheet, one line per tick, and a dark PID block appears at line 0. Our program is short, so it is done in less than a second. To watch the cursor, place a second trigger block with a button on the black floor next to your sheet, set it up the same way and press its button while you look at the rail.
How it works
PROGRAM signgives the program its name. Trigger blocks and display blocks find it by this name.- The two
NOOPlines do nothing. They are rules of c0de: line 1 is always a NOOP line, and every FUNCTION needs one right above it. FUNCTION welcomestarts a function: a part of the program with a name. A trigger block doesn't start "the program", it starts one of its functions.BEGINandEND FUNCTIONmark where the function starts and ends. The lines between them are one block further east, so you see at a glance that they belong to the function.CALL CLSis the first instruction: it clears the screen. CALL means "do this". CLS is short for "clear screen", a function that c0de already knows.CALL PRINTwrites on the screen. The line below it says what to write: the PARAMETERvalueis the text"Welcome to my base!". The;at the end says: the value is complete.- When the cursor reaches
END FUNCTION, the function and the program are done.
The computer carries out the lines from top to bottom. CLS comes first, so the text always starts on an empty screen, in its top left corner.
Try it yourself
- Add a second line of text below the first one, for example "Please wipe your feet.".
Solution
Add another CALL PRINT with its PARAMETER line after the first one. Every PRINT starts a new line on the screen afterwards, so the second text appears below the first.
PROGRAM sign
NOOP
NOOP
FUNCTION welcome
BEGIN
    CALL CLS
    CALL PRINT
        PARAMETER value "Welcome to my base!" ;
    CALL PRINT
        PARAMETER value "Please wipe your feet." ;
END FUNCTION- Put your own name on the sign, like "Welcome to Alex's base!".
Solution
Right-click the LITERAL in line 7 with an empty hand and change its text. The rest of the program stays the same.
PROGRAM sign
NOOP
NOOP
FUNCTION welcome
BEGIN
    CALL CLS
    CALL PRINT
        PARAMETER value "Welcome to Alex's base!" ;
END FUNCTION
Read more
- Your first program and Step by step in the guide
- Display block: display walls and how to bind them
- PRINT and CLS
- The cursor